Can you belive it’s Week 3 of the #SayNOToCrunches Challenge? If you’re reading this and have no idea what I’m talking about, go to SayNoToCrunches.com and sign up to receive 28 Day of workouts for FREE. Here on the blog are more detailed exercise descriptions and modifications. Click HERE to see Week 2 and HERE to see Week 1. For the rest of you, we are officially half way through! Whoohoo!
Just a reminder that your cardio exercises continue to remain the same, but the duration continues to increase. This week each exercise is performed for 50 seconds. I hope that you are now feeling pretty familiar with the cardio exercises, so that you can work on perfecting your technique a little more and push a little harder and faster, to really get your heart pumping and the calories burning. The workouts, as a whole, are relatively short, so don’t be afraid to go breathless!
This week is “Perfect the Plank” Week. It’s all about working to get the most out of your plank. You can always modify plank by putting your knees on the floor. Pregnant mamas-to-be and diastasis recti moms, please do NOT push too hard in these planks. Take lots of breaks and modify. Mommies-to-be, you can even elevate yourself on a table, couch or wall. You could also come back to the hover position that you got to know so well in Week 1.
Something important to remember: This is a core centric workout. Part of the reason that this is a #SayNoToCrunches challenge is that I wanted you to train sooooo much more than jsut your abs. Your core is not just your abs. It’s essentially from your breast bone to your hip bones and everything all around. So this means that when you are in plank, I want you to not only tighten your abs by pulling your navel to your spine and closing your rib cage, but I want you to squeeze your butt, contract your pelvic floor, and bring your shoulder blades closer together. I know – so much to think about, but if you do it, you will be working so many more muscles (which means better results)!
Here are the descriptions of the “Perfect the Plank” exercises and modifications (M):
Plank: Your position should be that of the top of a push up. Shoulders are directly over hands. Feet are shoulder width apart. Back is straight and long. Pull your navel to your spine so that your low back does not sink. If you are struggling to hold this position, take your legs farther apart to create a wider base of support. M: Besides taking your legs wider, you can also just bring your knees to the floor.
Single Leg Plank: From plank position, pull one knee into your chest and hold. M: Put your supporting knee on the ground.
Jack ‘N Plank: From plank position, soften your knees (like a jumping jack) and pull your feet together, so that your feet and legs touch, including (and especially) inner thighs. Soften your knees again and jump your legs back out. Repeat. M: Begin with feet together and alternate tapping one foot out to each side. If needed, you can also tap your knees down and rest for a moment after each rep.
Pigeon ‘N Plank: From plank position, alternate bringing one foot forward at a time so that your right foot touches your left wrist and then your left foot touches your right wrist. Try to keep your hips square to the floor the entire time. M: This takes some flexibility, so you can always just tap your foot half way up. If needed, you can also tap your knees down and rest for a moment after each rep.
Cross ‘N Plank: From plank position, alternate reaching your foot all the way through to the outside of your hands. In this variation, allow your hips to rotate so that you can bring your leg all the way through. M: If needed, you can tap your knees down and rest for a moment after each rep.
Squat ‘N Plank: From plank position, jump your feet into a sumo squat position. Keep your chest lifted as much as possible. Then jump your feet back to plank. M: Walk your feet into your squat one foot at a time and back out to plank one foot a time. You can also do this from a plank position on the knees.
Reaching Plank: From plank position, reach opposite arm and leg out at the same time. Hold for 15 seconds before repeating on the other side. M: You can perform the exercise with the knees on the floor, and just lift one limb at a time.
______________________________________________________________________________________________________________________________________________________
The Cardio Exercises are the same from last week, except that you perform each one for 50 seconds each.
High Knee Runs: Lift one knee at a time like you are going for a run. Bring your knees as close to your chest as possible, so that you get a nice contraction in your abdominals. Pump your arms as you run in place. M: March in place with high knees. PM: If you are very pregnant, you may need to bring your knees out to the side to allow room for baby.
Praying Mantis Runs: Rotate out from the hips so that when you run in place your knees are coming out towards the corners of the room, like a praying mantis. Keep your hands up open up your chest and bring your elbow towards your knee by laterally bending at the waist. This move will most likely make you feel awkward, and you will want to laugh (so laugh!). M: Lift one knee at a time as you bring your elbow towards our knee, so you are marching instead of running.
Burpees: This is one of the best full body movements you can do. Squat down (Make sure your heels stay not the floor) with your hands in front of your feet. Walk or jump back into a plank and lower yourself to the floor. Once your chest touches the floor, walk or jump your feet back to the squat. Stand back up or push off flop into a light jump. M: Just go out to a plank rather than lowering your chest to the floor. Also, if you are pregnant you will want to take your legs wide into a sumo squat, or you may want to use a chair. Place your hands on the chair and walk your feet back and in towards the chair. Taking the jump at the top out is also an option.
Skaters: Step out to the side, like you are doing a step touch, but cross one leg back. Repeat to the other side. Feel free to push off the floor so you have a little air time between sides. As an added challenge, when you cross back, keep the foot off the floor. Reach the arms across with the legs. M: Keep your body more upright and just step side to side, reaching the arms.
Split Lunge Jumps: Lunge back on one leg. From here push off the floor to attempt to straighten your legs. Land back in the lunge on the same leg. (Note: You are not switching legs. You do 30 seconds in a row on EACH leg). M: Take out the leg and just lunge up and down, quickly.
Tuck Jumps: Soften your knees and swing your arms back. Jump up and bring both knees to your chest and your hands to your knees. Please take breaks between jumps. M: Lots of options here. If you still want to jump, just do a soft jump up like at the end of a burpee, rather than tucking your knees. You could also do quick squats in place or lift one knee at a time like the High Knee modification.
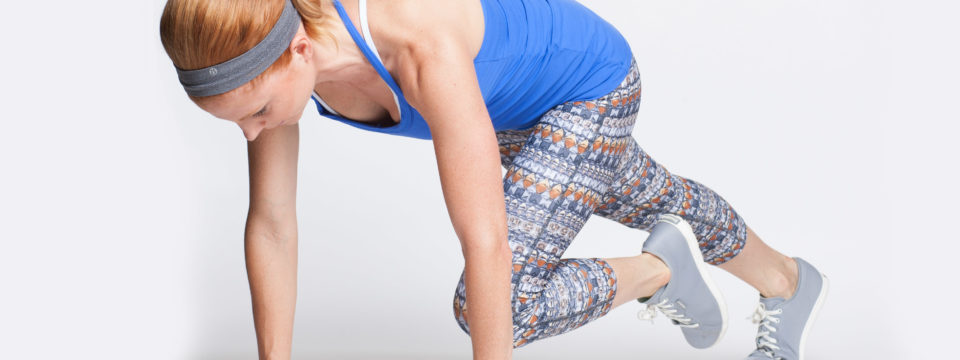
Knee Repeaters: Split your legs so you are in a long lunge. Clasp hands together and swing them back like a baseball back. Keeping your knee over your ankle on supporting leg, get as low as you can. Bring your back leg into chest and swing your arms across chest. You should feel a slight twist in the torso and a burn in your glute (butt cheek) of the supporting leg. Repeat this motion aggressively, until it’s time to do the other side. **Keep in mind you also do this exercise for 30 seconds on EACH leg. M: If this bothers your knees, do not go as deep into the lunge. PM: If you are pregnant and your belly is in the way, just tap the foot in, rather than lifting the knee up.